In this tutorial, I will show you how to create a simple REST client single-page app(SPA) with .NET 6.0 Blazor WebAssembly that enables users to make GET, POST, PUT, PATCH and DELETE requests to a REST API application. This is similar to Google Chrome plugin called Boomerang REST & SOAP Client, except our client isn’t a plugin but a one-page application.
I will test the application with the Employee REST API application that I developed from the previous tutorial called Simple REST API with database.
Download the whole Visual Studio project here!
Content
- How application works
- Project setup
- Create a razor component
- User interface
- Model
- Styling
- Form handler
- Implementation
- Conclusion
How application works
When you launch the application in the web browser, you will be presented with a page with three general sections – URL, Body and Status. Obviously, the URL textbox is where you enter the URL of the REST API that you want to use. There is also a dropdown from which you can choose a method or action.
You can enter a data, if needed, in the box labeled Body.
Finally, the box labeled Status tells us whether or not the request is successful, as well as other information with regards to the request.

Let’s try creating an employee record by sending a POST request to the REST API application.
POST
The Post method sends a request to the API to insert a record to the database.
As illustrated below, you enter the URL in the URL textbox, select a method in the METHOD dropdown box, and enter the employee data inside the Body box.
If request is successful, you get a response whose status equals Created. You also get some information on server, the resource location, date of the request, etc..
Note: The URL that I used in this example is the REST API application that I’m running separately in another instance of a Visual Studio.

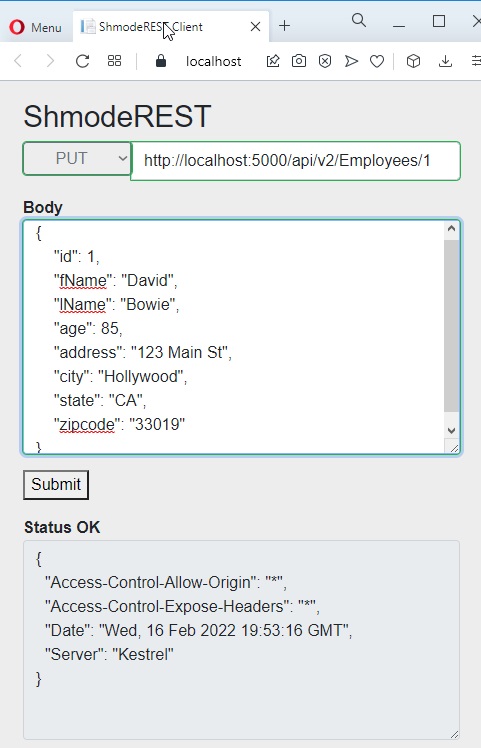
PUT
The PUT method sends a request to the API to change a value of a field in a database entity or record.
Like sending a POST request, you also send the whole employee record. The only difference is that you include the id in the JSON data. As illustrated below, I included "id": 1, and I changed the age to "age": 85.
Also notice that you also append the id number to the end of the URL. You get OK response when request is successful.
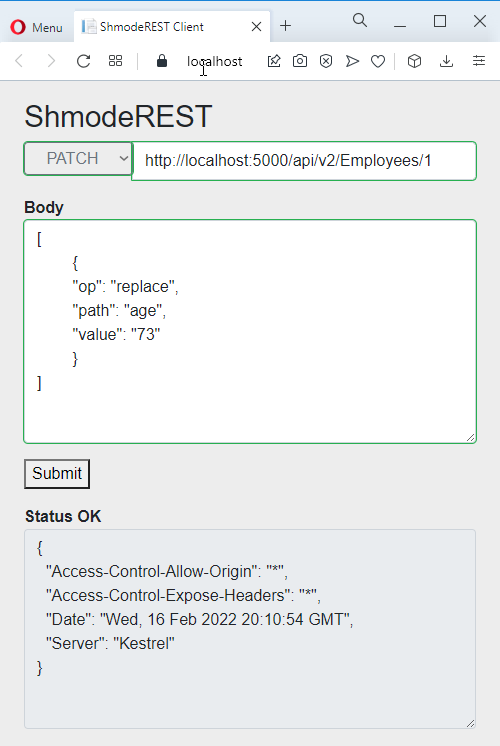
PATCH
The PATCH method sends a request to the API to change the value of a field in a database record or entity.
Unlike the PUT method, PATCH only requires you to send the field that you want changed. As illustrated below, the data you’re sending includes "op" for operation, "path" for the field you’re modifying, and lastly, "value" for the new value.
Like in PUT method, you also append the id number to the end of the URL. You get OK response when request is successful. In this example, I want to change the age of employee (whose id is 1) to 75 .
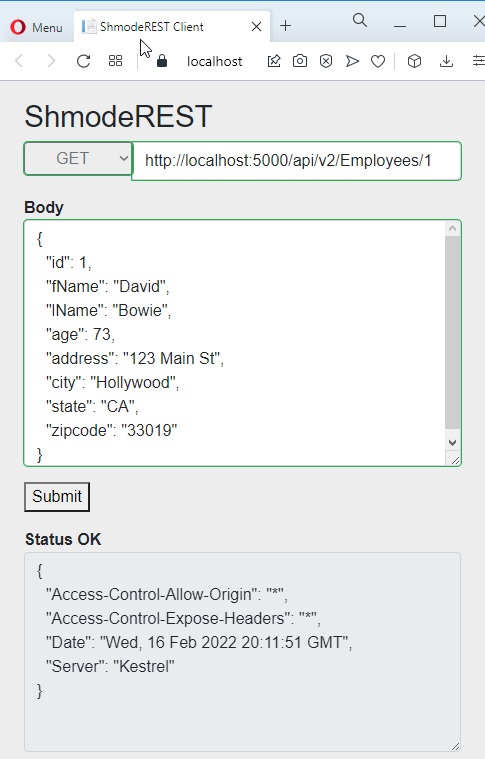
GET
The GET method sends a request to retrieve a record given the id of the employee, and in this example, whose id equals 1.
To get all the employee records instead, or if you don’t know the id number of the employee you’re looking for, don’t append any id number to the URL. The data you get back will include the employees’ id numbers. You get OK response when request is successful.
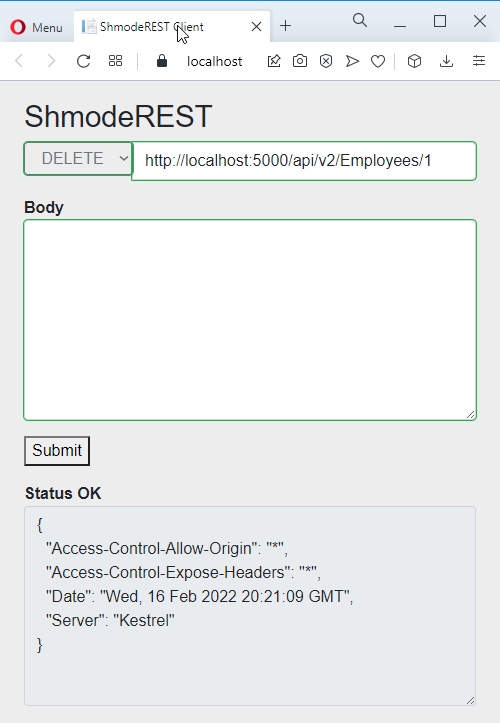
DELETE
The DELETE method sends a request to delete an employee record given an id number.
As illustrated below, I want to to delete an employee whose id equals 1, so I append the id number to the end of the URL. You get OK response when request is successful.
Let us now create the project in Visual Studio!
Project Setup
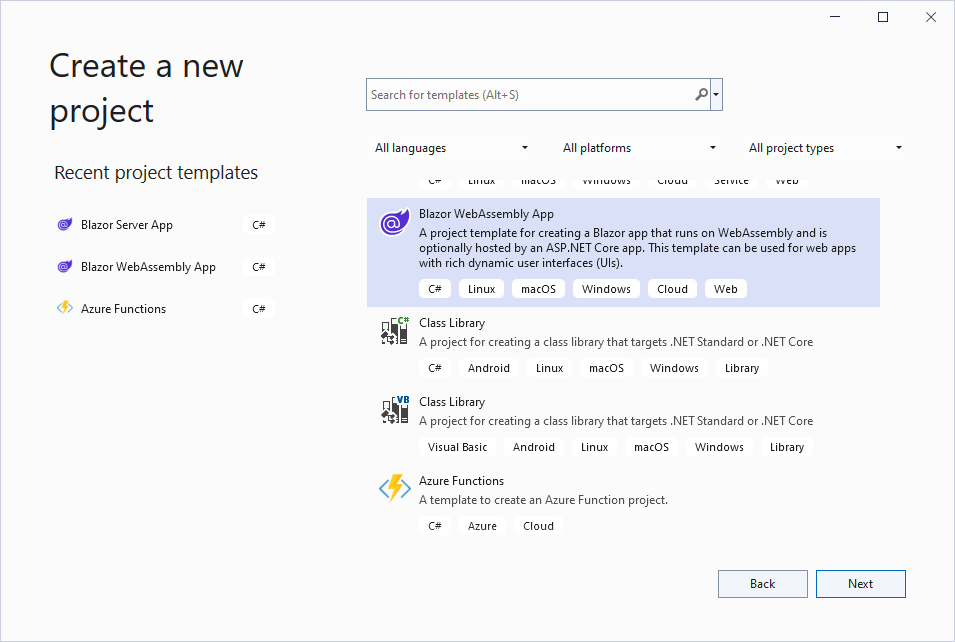
Open Visual Studio. Select Create a new project. In the Create a new project window, search for and select Blazor WebAssembly App. Click Next.
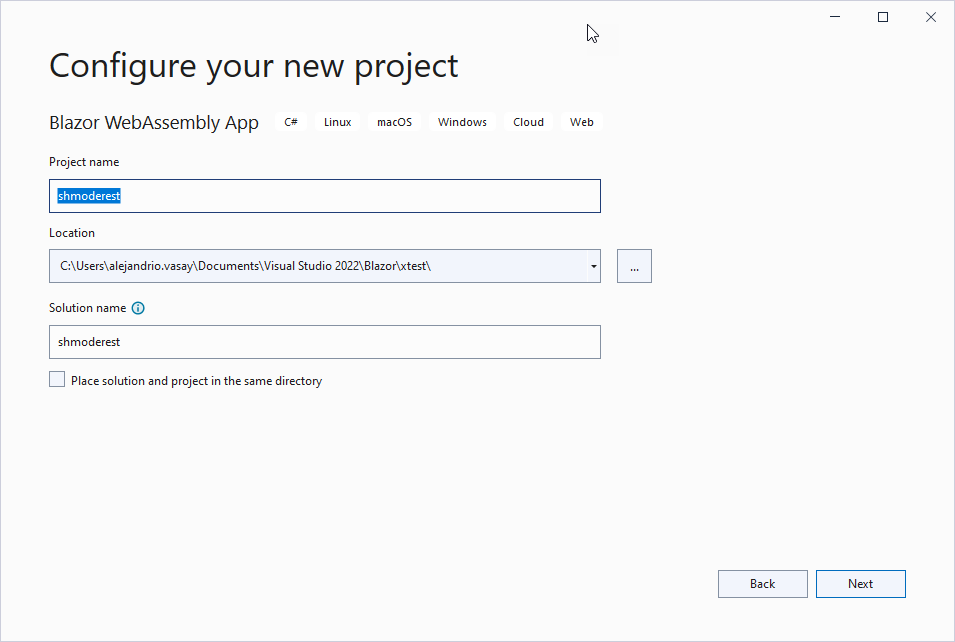
In Configure your new project window, enter a name for your project. I named my project shmoderest, as illustrated below. You may also choose to select the location of the project. Click Next.
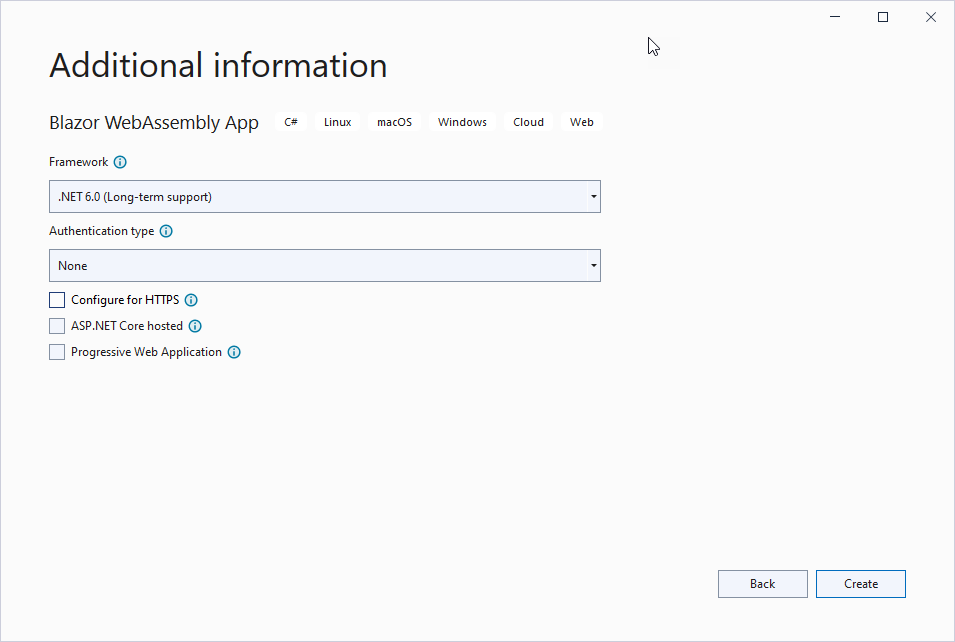
In Additional information window, you will be asked what Framework you want to use. Choose the latest .NET framework that is installed in your machine. Below was the settings I chose for this project. Click Create.
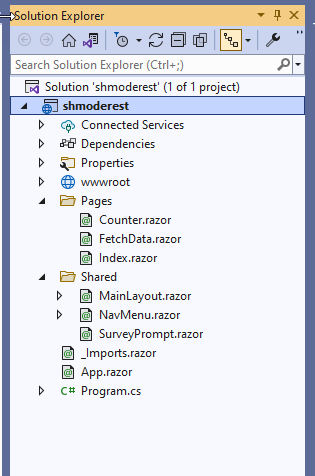
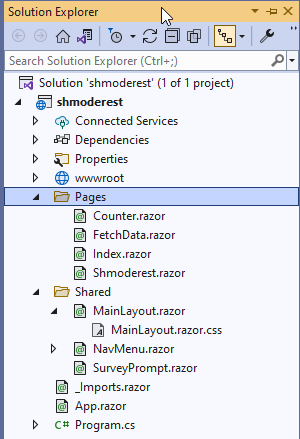
When the project is created, you should have most basic setup for a Blazor WASM app. As illustrated below in the Solution Explorer, the project consists of Program.cs, Pages and Shared folders, among others.
Running the initial program
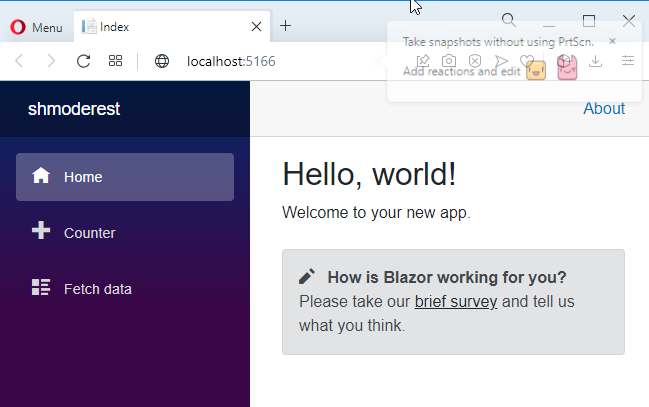
Just for fun, run the program by hitting either F5 or Ctrl-F5 or the green arrow button below the top menu. On desktop browser, you should see something like this:
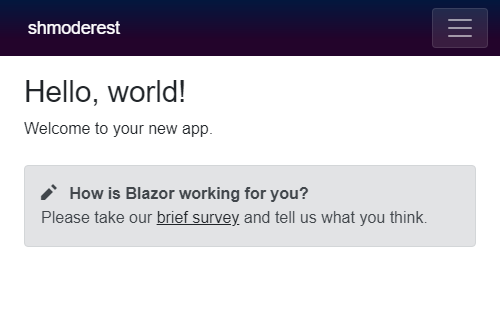
On a mobile window, you’ll see something like this:
You will notice in the menu on the left-side panel, that some Razor components have been implemented for us as examples. The Counter component of the application just counts how many times you click on a button, and displays the value as you click. The FetchData is a weather forecast component, which displays a tabular data of a five-day forecast.
Observe that the Counter component and FetchData component have the urls http://localhost:5166/counter and http://localhost:5166/fetchdata, respectively. The port number maybe be different in your local host.
Let us now create a Razor component for our REST client.
Create a Razor component
In the Solution Explorer, right-click the Pages folder, click Add > Razor Component. In the Add New Item window, at the bottom of the window, name the component anything as long as it ends in .razor. Click Add. In my case, the name is the same as my project name(shmoderest.razor), but you can definitely choose to name it more appropriately.
The new component is now listed under Pages in the Solution Explorer, as illustrated below.
If you open the new file, it contains bare minimum code, as illustrated below:
<h3>Shmoderest</h3>
@code {
}
When you run your program again, http://localhost:5166/shmoderest endpoint does not exist yet. To create it, add @page "/shmoderest" on the first line of our razor file, so that it now looks like this:
@page "/shmoderest"
<h3>Shmoderest</h3>
@code {
}
Rerun the program, and go to http://localhost:5166/shmoderest and you should now be able to see a blank page with Shmoderest heading.
Let’s first design our user interface!
User Interface
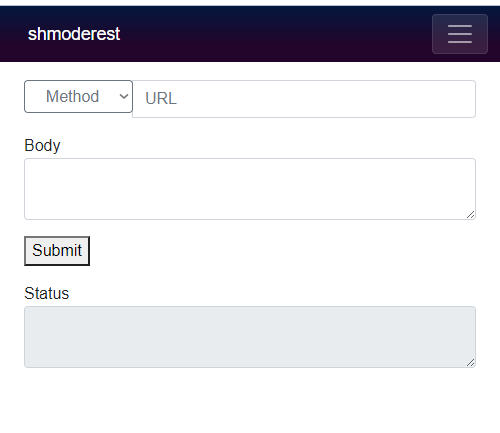
Let’s begin our implementation of our application by designing the UI(user interface) similar to this:

A quick look at html
Below is what our html code will generally looks like.
<EditForm>
<div>
    <InputSelect>
        <option selected value="-1">Method</option>
        <option value="GET">GET</option>
        <option value="POST">POST</option>
        <option value="PUT">PUT</option>
        <option value="PATCH">PATCH</option>
        <option value="DELETE">DELETE</option>
    </InputSelect>
</div>
<InputText />

<div>
    <InputTextArea />
</div>

<div>
    <button type="submit">Submit</button>
</div>

<div>
    Status
</div>

<div>
    <InputTextArea />
</div>
</EditForm>
The main Blazor components are <InputSelect> which represents the dropdown, <InputText> which represents the URL textbox, and <InputTextArea> which represents the two text areas. But first let’s quickly discuss model binding which we will integrate with our html later.
Model
When the user enters data in our forms, our backend code somehow needs to extract those information before we can do anything. Model binding in Razor pages or Blazor facilitates this process for developers by automatically binding forms to models. Having said that, let’s define a model with three properties – Action(or method), URL, and Body, which corresponds to the Method dropdown, the URL textbox, and the Body textarea, respectively.
public class RestModel
{
     public string? Action { get; set; }
     public string? Url { get; set; }
     public string? Body { get; set; }
}
RestModel? restModel = new();
Notice that we instantiate the model on line 7.
Let’s also define a List of methods that will populate the dropdown box. We’re doing this so that, instead of writing out five <option> tags in the html code, we can simply do a foreach loop to iterate through the List. We are going to call the variable methods, and this will be referenced in the UI.
List<string> methods = new List<string>() { "GET", "POST", "PUT", "DELETE", "PATCH" };Let’s also two more placeholders, and they are:
string? statusLabel = string.Empty;

public string? headersTextArea = string.Empty;
The statusLabel variable will be the placeholder for the status of the incoming response. Basically, we assigned it a value and then we’ll display it on the UI.
The headersTextArea is the placeholder for the headers in the http response. After we parse the response and find the headers that we want, we will then display their values on the page.
The updated html
Let us now modify the html to use our model, attributes and other variables.
As I mentioned earlier, The <InputSelect> component on line 3 creates the dropdown box that will display options such as GET, POST, PUT, PATCH and DELETE, and allows users to choose what action they want to take when submitting a request. Notice the newly added attributes on line 1, 5, 11, 14, 22 and 26.
<EditForm Model="@restModel">
<div>
    <InputSelect @bind-Value="restModel.Action">
        <option selected value="-1">Method</option>
        @foreach (var m in methods)
        {
            <option value=@m>@m</option>
        }
    </InputSelect>
</div>
<InputText @bind-Value="restModel.Url" placeholder="URL" />

<div>
    <InputTextArea @bind-Value="restModel.Body" />
</div>

<div>
    <button type="submit">Submit</button>
</div>

<div>
    Status @statusLabel
</div>

<div>
    <InputTextArea @bind-Value="headersTextArea" />
</div>
</EditForm>
Let me explain the changes that we made in the html starting with the <InputSelect> component.
InputSelect
restModel on line 1 encapsulates user data such as action, URL, and body.
restModel.Action on line 3 binds to the value selected by the user.
The foreach loop on line 5 iterates through the List of methods and builds our <select><option> element.
InputText
The <InputText> on line 11 corresponds to textbox in which you enter URL. Also notice that the entered value will be bound to restModel.Url.
InputTextArea
The <InputTextArea> components on line 14 and 26 corresponds to the Body and Headers, respectively.
Body textarea is where user enters the JSON data that we send with the POST, PUT, and PATCH requests.
Headers textarea is where we display some of the http headers in the response that we received from the REST API.
Before we dive into styling, make sure you run the program and see if the page looks OK, and that the dropdown box shows the five methods.

Styling
As you can see above, the page doesn’t look like very pretty; the boxes are not aligned because we haven’t applied any styling to it. Fortunately, it’s easy to apply styling because Bootstrap CSS was installed for us when we created the Blazor project. In fact, Bootstrap was exactly what the Counter and FetchData used for their styling.
Our razor file should now look like this with the model and Bootstrap styling together:
@page "/shmoderest"

<EditForm Model="@restModel" >
<div class="input-group mb-3">
    <div class="input-group-prepend">
        <InputSelect @bind-Value="restModel.Action" class="btn btn-outline-secondary dropdown-toggle" type="button" data-toggle="dropdown" aria-haspopup="true" aria-expanded="false">
            <option selected value="-1">Method</option>
            @foreach (var m in methods)
            {
                <option value=@m>@m</option>
            }
        </InputSelect>
    </div>
    <InputText @bind-Value="restModel.Url" placeholder="URL" class="form-control" aria-label="Text input with dropdown button" />
</div>

<div class="input-label">Body</div>

<div class="input-group mb-3" >

 <InputTextArea @bind-Value="restModel.Body" class="form-control" aria-label="With textarea" />
</div>


<div class="input-group mb-3">
<button type="submit">Submit</button>
</div>

<div class="input-label">Status @statusLabel</div>
<div class="input-group mb-3" >
<InputTextArea @bind-Value="headersTextArea" readonly="true" class="form-control" aria-label="With textarea" />
</div>

</EditForm>
@code {
    public class RestModel
    {
        public string? Action { get; set; }
        public string? Url { get; set; }
        public string? Body { get; set; }

    }

    RestModel? restModel = new();

    List<string> methods = new List<string>() { "GET", "POST", "PUT", "DELETE", "PATCH" };

    string? statusLabel = string.Empty;

    public string? headersTextArea = string.Empty;
}
I’m not going to explain the various CSS classes that I added above, as this is not the goal of the tutorial. Suffice it to say that I use input-group and mb3 classes to align the boxes. You can read up on them for more information or just experiment with these stylings on your own.
If we run it once more, we get a prettier looking page.
The next thing we need to tackle is how to handle the Submit button.
Form Handler
When we hit Submit, we need to somehow handle that event. For this purpose, we need to add the OnValidSubmit attribute inside <EditForm> (line 3 in the above code) like so:
<EditForm Model="@restModel" OnValidSubmit="@HandleValidSubmit">When Submit is clicked, a method called HandleValidSubmit() will then be called. This method is the bulk of our application and will handle the GET, POST, PUT, PATCH and DELETE requests coming from the user. Basically, the skeleton code for this method looks like this:
private async Task HandleValidSubmit()
{

        if (restModel.Action == "GET")
        {

        }
        else if (restModel.Action == "POST")
        {
        }
        else if (restModel.Action == "DELETE")
        {
        }
        else if (restModel.Action == "PUT")
        {
        }
        else if (restModel.Action == "PATCH")
        {
        }
        else
        {
            headersTextArea = "Method not selected. Try again.";
        }
    }
    catch (Exception ex)
    {
        System.Console.WriteLine("Error: " + ex.GetBaseException().ToString());
        headersTextArea = ex.GetBaseException().ToString();
    }
}
As shown above, we check the value bound to the Action property of our model, and we use if-else condition to handle the different values. We make use of HttpClient and HttpResponse to call the REST API service that we’re interested in using.
Let’s now talk about each of the routines for each of the actions starting with GET method.
GET
Basically, the routine for GET (and pretty much all the other Http methods) is shown below in pseudocode.
if(GET)
    call HttpClient->GetAsync to get data from URL
    call HttpResponse->ReadAsStringAsync to read data
    Deserialize data into a .NET object
    Serialize data back to Json string for proper display in Body text box.
Hence, the actual code for GET is shown below:
if (restModel.Action == "GET")
{
    // Get the response from the given URI
    responseMessage = await httpClient.GetAsync(restModel.Url);

    // Extract content(body) of response
    var content = responseMessage.Content.ReadAsStringAsync().Result;

    // Deserialize json string to Json
    var contentJson = JsonConvert.DeserializeObject<object>(content);

    // Serialize with indentation for nice display
    restModel.Body = JsonConvert.SerializeObject(contentJson, Formatting.Indented);

    DisplayHeaders();
}
On line 4, the result of the GetAsync call is actually a HttpResponseMessage object, and so we store it in our own HttpResponseMessage variable that we will use later to pass to DisplayHeaders() function on line 15.
DisplayHeaders() is a function that parses the response headers, stores them in dictionary, and serializes the dictionary to JSON string for proper display in the Status text box. I will show the implementation of this function at the end of this section.
POST
For the POST routine we’ll be using PostAsync instead of GetAsync. And unlike the GET routine, we are also sending the content that the user entered in the Body text box, as shown below:
if (restModel.Action == "POST")
{
    // Create a formatted text (as json) to be used for PUT or POST methods.
   var stringContent = new StringContent(restModel.Body, Encoding.UTF8, "application/json");

   // Call POST method given a URL and StringContent
   responseMessage = await httpClient.PostAsync(restModel.Url, stringContent);

   DisplayHeaders();
}
The restModel.Body property on line 4 is bound to the value of the Body text box in which the user enters a JSON data. We store the data into StringContent object so we can pass this object to PostAsync. And again, we call DisplayHeaders() to extract the response headers.
PUT
The routine for PUT would be more or less the same as that of POST, in that we also send the whole JSON data PutAsync. Like I mentioned earlier, PUT method is how we change the database values, but instead of sending only the fields that we’re changing, we send the whole record.
if (restModel.Action == "PUT")
{
     // Create a formatted text (as json) to be used for PUT or POST methods.
     var stringContent = new StringContent(restModel.Body, Encoding.UTF8, "application/json");

     // Call PUT method given URL and StringContent
     responseMessage = await httpClient.PutAsync(restModel.Url, stringContent);

     DisplayHeaders();
}
The only difference from POST is the content of the data we’re sending, in that, one of the properties (or fields) has been modified.
PATCH
Like I also mentioned earlier, PUT method is also how we modify the database just like PUT, but unlike PUT we instead send only the property that we’re changing. Having said that, the PATCH routine below is still very similar to PUT because we still need to send the data in a StringContent, and pass it on to PatchAsync.
if (restModel.Action == "PATCH")
{
     var stringContent = new StringContent(restModel.Body, Encoding.UTF8, "application/json");

     // Call PATCH method given URL and StringContent
    responseMessage = await httpClient.PatchAsync(restModel.Url, stringContent);

    DisplayHeaders();
}
DELETE
The last method we’re implementing is DELETE, and it just allows us to delete a record given ID. This is the simplest routine in that we only need to pass the URL to DeleteAsync (if you remember from the demonstration from earlier, we append the employee ID to the end of the URL to let the application know we want to delete the record with that ID).
if (restModel.Action == "DELETE")
{
    // Call DELETE method given a URL
    responseMessage = await httpClient.DeleteAsync(restModel.Url);

    DisplayHeaders();
}
Even without the DisplayHeaders() function, the routines above will still work, however, we’re not going to be able to display the status of the call to the HttpClient. It would be nice to display that the status of a GET method is “Created”, or that the status of the POST method is “OK”. It would also be helpful for developers using the REST API service to know some headers from the response such as the the server that sent it, or the URL endpoint of the resource. So next we discuss briefly the DisplayHeaders() function.
DisplayHeaders
The DisplayHeaders() function is really just a routine that I put in a separate function so that it can be called multiple times. More specifically, the function is actually this: DisplayHeaders(responseMessage, HeaderKeyPairs);
That is, we pass two things – the actual HttpResponseMessage object that was returned from the Async methods, and also a variable I call HeaderKeyPairs which temporarily holds the headers and their values that we parse from the response object (alternatively, I could have just made it a global variable, and didn’t have to pass it around, oh well).
This is actually the LAST thing that we need to do, and then we’re DONE! Instead of showing you the source code listing for this function, I will instead show you the listing of the full source code of our Blazor page.
Full Source Code of Shmoderest.razor
@page "/shmoderest"

@using Newtonsoft.Json;
@using Newtonsoft.Json.Linq;
@using System.Text
@inject HttpClient httpClient

<PageTitle>ShmodeREST Client</PageTitle>


<EditForm Model="@restModel" OnValidSubmit="@HandleValidSubmit">

<div class="input-group mb-3">
    <div class="input-group-prepend">
        <InputSelect @bind-Value="restModel.Action" class="btn btn-outline-secondary dropdown-toggle" type="button" data-toggle="dropdown" aria-haspopup="true" aria-expanded="false">
            <option selected value="-1">Method</option>
            @foreach (var m in methods)
            {
                <option value=@m>@m</option>
            }
        </InputSelect>
    </div>
    <InputText @bind-Value="restModel.Url" placeholder="URL" class="form-control" aria-label="Text input with dropdown button" />
</div>

<div class="input-label">Body</div>

<div class="input-group mb-3" >

 <InputTextArea @bind-Value="restModel.Body" class="form-control" aria-label="With textarea" />
</div>


<div class="input-group mb-3">
<button type="submit">Submit</button>
</div>

<div class="input-label">Status @statusLabel</div>
<div class="input-group mb-3" >
<InputTextArea @bind-Value="headersTextArea" readonly="true" class="form-control" aria-label="With textarea" />
</div>

</EditForm>


@code {

    HttpResponseMessage? httpResponse;

    RestModel? restModel = new();

    string? statusLabel = string.Empty;

    public string? headersTextArea = string.Empty;

    List<string> methods = new List<string>() { "GET", "POST", "PUT", "DELETE", "PATCH" };

    public class RestModel
    {
        public string? Action { get; set; }
        public string? Url { get; set; }
        public string? Body { get; set; }

    }

    private async Task HandleValidSubmit()
    {
        Dictionary<string, string> HeaderKeyPairs = new();
        HttpResponseMessage responseMessage =  new();
        try
        {
            if (restModel.Action == "GET")
            {
                // Get the response from the given URI
                responseMessage = await httpClient.GetAsync(restModel.Url);

                // Extract content(body) of response
                var content = responseMessage.Content.ReadAsStringAsync().Result;

                // Deserialize json string to Json
                var contentJson = JsonConvert.DeserializeObject<object>(content);

                // Serialize with indentation for nice display
                restModel.Body = JsonConvert.SerializeObject(contentJson, Formatting.Indented);

                DisplayHeaders(responseMessage, HeaderKeyPairs);


            }
            else if (restModel.Action == "POST")
            {
                // Create a formatted text (as json) to be used for PUT or POST methods.
                var stringContent = new StringContent(restModel.Body, Encoding.UTF8, "application/json");

                // Call POST method given a URL and StringContent
                responseMessage = await httpClient.PostAsync(restModel.Url, stringContent);

                DisplayHeaders(responseMessage, HeaderKeyPairs);

            }
            else if (restModel.Action == "DELETE")
            {
                // Call DELETE method given a URL
                responseMessage = await httpClient.DeleteAsync(restModel.Url);

                DisplayHeaders(responseMessage, HeaderKeyPairs);

            }
            else if (restModel.Action == "PUT")
            {
                // Create a formatted text (as json) to be used for PUT or POST methods.
                var stringContent = new StringContent(restModel.Body, Encoding.UTF8, "application/json");

                // Call PUT method given URL and StringContent
                responseMessage = await httpClient.PutAsync(restModel.Url, stringContent);

                DisplayHeaders(responseMessage, HeaderKeyPairs);
            }
            else if (restModel.Action == "PATCH")
            {
                var stringContent = new StringContent(restModel.Body, Encoding.UTF8, "application/json");

                // Call PATCH method given URL and StringContent
                responseMessage = await httpClient.PatchAsync(restModel.Url, stringContent);

                DisplayHeaders(responseMessage, HeaderKeyPairs);
            }
            else
            {
                headersTextArea = "Method not selected. Try again.";
            }


        }
        catch (Exception ex)
        {
            System.Console.WriteLine("Error: " + ex.GetBaseException().ToString());
            headersTextArea = ex.GetBaseException().ToString();
        }

    }

    private void DisplayHeaders(HttpResponseMessage responseMessage, Dictionary<string, string> HeaderKeyPairs)
    {
        //============ DISPLAY HEADERS ====================//
            // Extract the headers from the response into a dictionary
            statusLabel = responseMessage.StatusCode.ToString();
            var headers = responseMessage.Headers;
            for(int i=0; i < headers.Count(); i++)
            {
                var key = headers.ElementAt(i).Key;
                var value = headers.ElementAt(i).Value.FirstOrDefault();
                HeaderKeyPairs.Add(key, value);
            }
            // Deserialize dictionary to Json so it's displayed nicely in browser
            headersTextArea = JsonConvert.SerializeObject(HeaderKeyPairs, Formatting.Indented);
    }

}
And that’s it, folks! I hope this tutorial is not all over the place. Again, you can download the Visual Studio project from my Github and you can run it and play around with it.
Conclusion
This tutorial showed how to use Blazor WebAssembly to implement a web-based application to send HTTP requests to a REST API service.
.NET Blazor WebAssembly can be used for implementing client side applications like the Shmoderest REST Client application shown in this tutorial. It is downloaded once in the user’s web browser, and works independently of the server. The initial download takes a little longer than Blazor Server because of bigger file download, but the performance more than makes up for it.
